There are two ways to install the OS on Raspberry Pi. The right method depends on your use case.
Option 1: Raspberry Pi Imager
- Fastest and easiest setup
- Ideal for testing and first-time users
- Uses a prebuilt OS image
Option 2: emteria Installer (Recommended)
- Installs the latest version of the OS
- Required for development and production use
- Enables device registration, updates, and long-term support
Not sure which method to choose?
- “I just want to try it quickly.” → Use Raspberry Pi Imager
- “I want the latest version and full features.” → Use emteria Installer
Install Android using Raspberry Pi Imager
Note:
1. Download and install Raspberry Pi Imager.
Visit the Raspberry Pi website and navigate to the Install Raspberry Pi OS using Raspberry Pi Imager section. Download the right version (Ubuntu for x86, Windows, macOS). Proceed with the instructions to finish the Imager installation.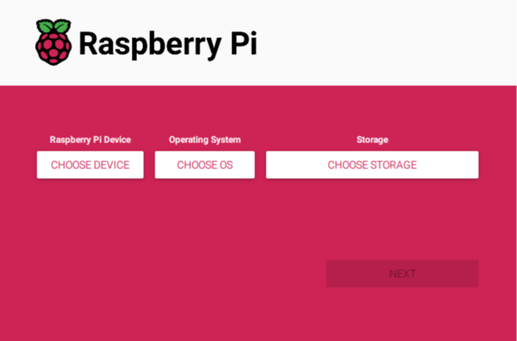
2. Insert SD card and launch Raspberry Pi Imager.
Insert your SD card into the SD card slot or card reader on your PC. Open the Raspberry Pi Imager. If you see a prompt, make sure to grant any necessary permissions for the application to run.
3. Choose Raspberry Pi device.
Select Raspberry Pi 5.
4. Choose Operating System.
Within the Raspberry Pi Imager, you will be presented with a selection of operating systems to choose from. Opt for the Freemium and paid-for OS section.
Note: Our free Starter plan does not have any hidden costs and it does not require a credit card for registration or future use.
5.Select Android for Raspberry Pi 5.
Choose Android by emteria and select Android 15 (RPi 5).

6. Choose SD card and write image
Click on Choose SD Card and select the SD card you want to use. Then, click on Write. A dialog box will pop up, so make sure to double-check that you have chosen the correct SD card. Once you are sure, click on Confirm to proceed.
7. Wait for write process and verification.
The emteria Android OS image will be written to the SD card and then automatically verified to ensure that the image matches the original. This process may take a few minutes, so please be patient and avoid interrupting it.
8. Insert SD card into Raspberry Pi.
After you see the success message, you can safely remove the SD card. Remember to turn off your Raspberry Pi before inserting the SD card and connecting your peripherals.
9. Power on your Raspberry Pi.
Lastly, turn on your Raspberry Pi. This will initiate the boot process from the SD card, allowing the newly installed Android OS by emteria to run smoothly.
Next steps: Follow our tutorial to on how to register for a new account, where to get a free starter subscription and how to activate your device with your emteria account.