.png?width=619&height=573&name=Group%2090(1).png)
Are you hearing about Android Debug Bridge (ADB) for the first time? No worries, in this article we will discuss everything related to ADB.
Android Debug Bridge (ADB) is simply defined as a tool that enables one device to link with another.
In other words, ADB is usually used whenever you want to bridge communication between an emulator, which in our case can be a handset, and a server. It aids you in performing tasks not limited to either installing or debugging a handset. In addition to this, Android provides a few solutions whenever you want to link a real handset via USB.
What is Android debug bridge for Windows?
Before we jump into this, you should know that the ADB is compatible with both Mac and Linux; it’s not only used in Windows alone, as many do think.
Installing Android debug bridge on Windows 7
If you want to configure ADB on any Windows PC, you must first download and then install the SDK.
Upon completing that, all you will have to do next is extract the file. It's always highly recommended that you perform this action directly to your C:\DRIVE since doing so will minimize the time that you would have used to navigate the subfolders and perform commands.
Finish the process by double-clicking on the SDK Manager.exe file and installing all the default packages.
When connecting your phone, install the OEM driver designed for your phone. When using Mac and LINUX, there isn’t any need to install the driver. Ensure the debugging option in your phone is active. This setting varies on every phone.
Connect your phone using the USB port and wait for the driver to be installed. Use the Command Prompt window to type the following command which will enable you to move to the platform-tools folder cd C:\adt-bundle-windows-x86_64-20131030\adt-bundle-windows-x86_64-20131030\sdk\platform-tools
What can you do with ADB?
Are you wondering about everything that you can do using the ADB? Well, if you are not sure, then here’s a list of all that you can do with ADB:
- Rooting your phone – this is the most common and also the most basic function that is always known to be mandatory among the Android developers who always want to root Nexus or any Android phone of their choice.
- Installing applications – Do you want to install an application that isn’t available on Google Play in your location? Or even one that was deleted from the store? If so, then, you’re covered. The ADB command will simply install any APK file assuming the installation of applications from unknown places is allowed.
- Sending and Receiving Files between two connected devices – you can easily transfer files between two connected devices.
- Other vital commands – several other functions such as flashing ROMs will be possible if you boot into recovery mode. In most cases, this is usually done by holding certain buttons on your device for a given time. Through the ADB, you are capable of installing a ROM in your computer (very efficient when running low on external sd memory).
How does ADB work?
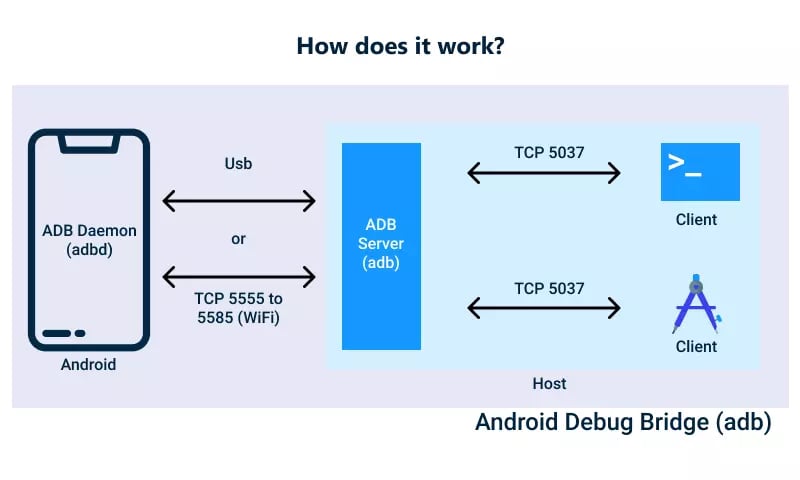
Just like described, ADB enables you to link with another device. ADB is a client-based server-like program that comprises components namely:
- A client – sends commands.
- A daemon – it’s built to deliver commands to the connected device. The daemon delivers commands while in the background.
- A server – links all communications to the client and daemon. Similar to the daemon, the server also runs while in the background.
We can now learn how ADB operates, isn’t that so? Powering on the ADB client will begin by finding any ADB process that is in progress. If not, it will trigger the process. When the server starts, it adds your local TCP port and then waits for commands from ADB clients. You also need to be aware that all of the ADB connects through port 5037 when communicating with the ADB server.
The server will then build connections for all devices. It will then find emulators by looking for ports having odd numbers from 5555 to 5585 since the first 16 emulators use them. When the server spots a daemon, it will build a connection to the port.
The server will finalize building connections for every device connected; you are then permitted to use the commands to access those devices.
USB debugging and ADB configuration
APPIUM is a plus for the execution test on connected devices. But again, before you decide to run the test, you need to conduct all these below:
- Turn on debugging
- Configure ADB
- Best setup based on a given hardware
Upon completing the above listed, let’s now find out how you can connect to the emulator and a real device for testing.
Connecting to an emulator
Well, one more thing is, to install SDK. The ADB provides Google’s Android SDK.
Enabling the ADB from your SDK manager
These are some of the steps that you need to follow:
- Open your Android SDK folder
- Double click SDK Manager
- In the long list of the packages, choose Tools and mark the checkbox for the Android tools SDK Tools and Android SDK Platform-tools.
Connecting Android device with the ADB (Android debug bridge)
For you to successfully connect your Android Device using ADB (Android ADB Debug) you will have to follow the detailed steps below:
1: Turn on the USB debugging on your device
The first thing or step that you need to do is simply to turn on USB debugging found in the ‘Developer Option’. Upon doing so, connect your handset to your computer via the USB cable.
2: The Android SDK
To find it, all you need to do is to simply find and look into the local folder where SDK files are stored – ‘Android SDK>>Platform-tools’ such as C; \android-sdk\platform-tools.
3: The command window
Press Shift + Right-click menu >> Select ‘Open command window here’ option.
To do so, you need to have an opened file via command prompt.
Note – Alternatively, you can open the folder path directly through the Run command available in the command prompt.
4: Linking an external Android device
Before checking your device, you need to connect your handset in advance. You can have this done via a USB cable.
Type command:'adb devices' & hit the Enter key.
You should have a display of all the devices connected.
Before you do it, you need to check the server. Here, you will need to find out whether it’s operating as a background processor or if it’s not. Doing that is easy, you only need to open the command prompt from the above-detailed procedure and then type Android Debug Bridge and then finish by hitting the enter key. After doing that, you should be able to see all the processes running.
Configuring ADB for Wi-Fi support
Same as the way we have configured the connection via the USB, you can also configure Android Debug Bridge over Wi-Fi.
Requirements:
These are some of the things that you will have to do or have so as to achieve all these:
- The Android device and the host computer needs to be connected to the same wireless network
- You need to turn off Bluetooth
Steps:
- Through the cable, link the computer. Ensure that debugging is turned on.
- Ensure that your chosen handset is linked using TCP/IP via port 5555. Use command - $ adbtcpip 5555
- Disconnect the cable
- Search for the IP address in the Settings >>Wi-Fi Setting >> Advanced >> IP Address. You should also use the same Android Debug Bridge IP address to link the handset through a cable connection
- eg: Network IP address such as - 148.100.1.17
- $ ADB devices
- List of handsets linked
- 148.100.1.17:5555 device
You will not get the final configuration completed and the ‘ADB’ fully configured through the wireless network.
You should also have in the back of your mind that in case of a connection error, you should simply reset or turn off the computer.
Emulator not listed
Are you aware that the handset command has corner case command options that make operating emulators not visible in the handsets output even if you are seeing the devices on your desktop?
You will experience this whenever all or any of the below stated happens:
- When a server is not running
- Using the emulator command having the –port or –ports choices of an odd-numbered port value from 5554 to 5584
- The given odd number port that chosen isn’t busy making it possible for the port connection to be made on given port number, or when it’s in use, the emulator finds other alternative port that matches the needed requirements of point 2
- Starting the server after the emulator
So, how can you prevent experiencing this? Well, all that you need to do is allow the emulator to find its own ports, and limit using many emulators at a time. Alternatively, start the server prior to initiating the emulator command.
Sending commands
When several devices are linked, you need to single out the chosen device when you are initiating commands. To single out a chosen device, use a command to find the serial number of the chosen handset or emulator. Upon having the serial number, proceed by using the –s option together with the commands to single out the serial number. When issuing any commands, you can choose to set the $ANDROID_SERIAL environment variable to have the serial number instead. If you use both -s and $ANDROID_SERIAL, -s override $ANDROID_SERIAL.
You also need to be aware that when you issue a command without singling out a target device where there are many devices, then you need to expect an error message.
In addition to that, when you have several devices connected, but only one of them is an emulator, then you need to use the e-option to send commands to the emulator. Similarly, when there are several devices but only one hardware device attached, then you need to use the –d option for you to send commands to the hardware device.
Installing an app
Just like mentioned earlier, you can install an APK on an emulator or connected device using the install command: ADB install path_to_apk
When doing this, you also need to use the –t option and an install command when installing a test APK. You should also know that when you are using Android Studio, it’s not compulsory to use Android Debug Bridge directly when installing your app on the emulator or the device connected. This is because the Android Studio does the packaging and installation of the app for you.
Setting up port forwarding
Do you know that you can use the forward command to set up arbitrary port forwarding, which in turn forwards requests on the specified host port to another port of a device?
Summary
- Android Debug Bridge allows you to communicate with other devices.
- You can use Windows, Mac and even Linux.
- A client – this transmits the commands.
- A daemon – this is tasked by running commands on a device. The daemon is tasked to run as a background process on each of the devices.
- A server – the server is tasked with managing all the communications between the client and the daemon. Just like the daemon, the server runs in the background.
- You can use ADB when rooting your phone, installing apps, sending and receiving files across devices among many other important operations.
Build unique products, boost device performance
See why emteria is the chosen Android™ customization & management platform for OEM solution builders — and what it can do for your team and customers.
Table of contents